

You have 3 options to facilitating recording:
- Start/stop recording by tapping the record button right on the primary device
- Connect a bluetooth remote to control recording
- Connect another iOS device and use it as a remote control to facilitate the assessment
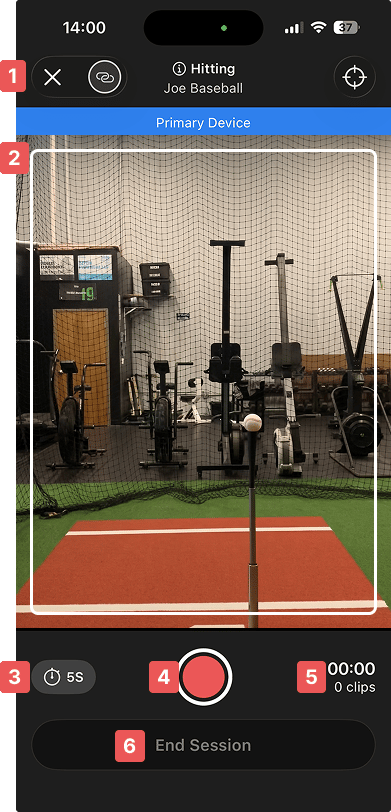
Uplift Capture recording screen
The Uplift Capture recording screen includes the following elements:
- Header: displays current movement, athlete name, the device (Primary / Secondary / Remote) and a few other controls.
- Video window: displays the current camera view. On remote control devices, this will be blank.
- Camera timer control to switch between short and long timer modes (or auto-capture, if capturing a supported movement)
- Record button: to start and stop recording, or indicate recording status if using a remote.
- Clip timer and clip count: displays recording time of the current clip, and how many clips you’ve captured in this assessment.
- End session button: to end the current assessment
Chosing camera timer
Every movement has 2 timer options: a short timer and a long timer. Choose whichever one is most comfortable to ensure you capture the entire movement in the video. Note: when using the long timer, it is highly recommended to manually end the recording rather than letting the timer run out.
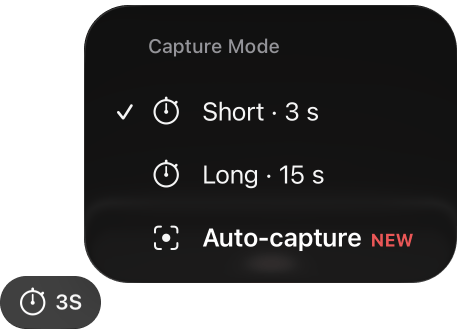
Auto-capture
Auto-capture is a new feature that automatically detects and records a movement, and is currently only available for 1-camera hitting captures. Learn more about auto-capture here.Recording a movement
When manually recording a movement - whether from a bluetooth remote or an iOS device, you tap the red record button once to start a recording. The bottom of the screen will turn red indicating the video is recording. To end a recording, you can either- Let the timer run out on its own
- Tap again to end the recording
Tips:
- Uplift Capture works best when the video contains the whole movement, but not a lot of extra video after the movement, so it’s highly recommended to end the recording manually if possible.
- Make sure the video catches the entire movement - if the beginning or end is cut off, it will not process successfully.