> ## Documentation Index
> Fetch the complete documentation index at: https://docs.uplift.ai/llms.txt
> Use this file to discover all available pages before exploring further.

# Getting Started

> Everything you need to set up Uplift Capture, run your first assessment, and review your results.

<img src="https://mintcdn.com/upliftlabs/zrkhfCm1PbAiD5WS/images/guides/quick-start-guide-title.png?fit=max&auto=format&n=zrkhfCm1PbAiD5WS&q=85&s=016ff8c4cff8bc9c686de1689d94fbae" alt="Quick Start Guide" style={{display: 'block', margin: '0 auto'}} width="1379" height="522" data-path="images/guides/quick-start-guide-title.png" />

Follow these steps to get up and running, perform your first Uplift Capture assessment, and review your results.

Questions along the way? Email us at [support@uplift.ai](mailto:support@uplift.ai).

## Getting started
<AccordionGroup>
  <Accordion title="How Uplift Capture works" icon="lightbulb">
    Uplift Capture assesses an athlete's movement in full 3D using only 1 or 2 iOS devices, and generates biomechanical data and movement insights that empower coaches, trainers, clinicians, and organizations to evaluate player movement health, improve performance, and reduce injury risk.

    <img src="https://mintcdn.com/upliftlabs/oV9tpj3Bprj6gcRa/images/guides/getting-started/how-it-works-dark.png?fit=max&auto=format&n=oV9tpj3Bprj6gcRa&q=85&s=1ab0dfe471111427e7ce2b08f6f8c3d8" alt="" style={{display: 'block', margin: '0 auto'}} width="2930" height="960" data-path="images/guides/getting-started/how-it-works-dark.png" />

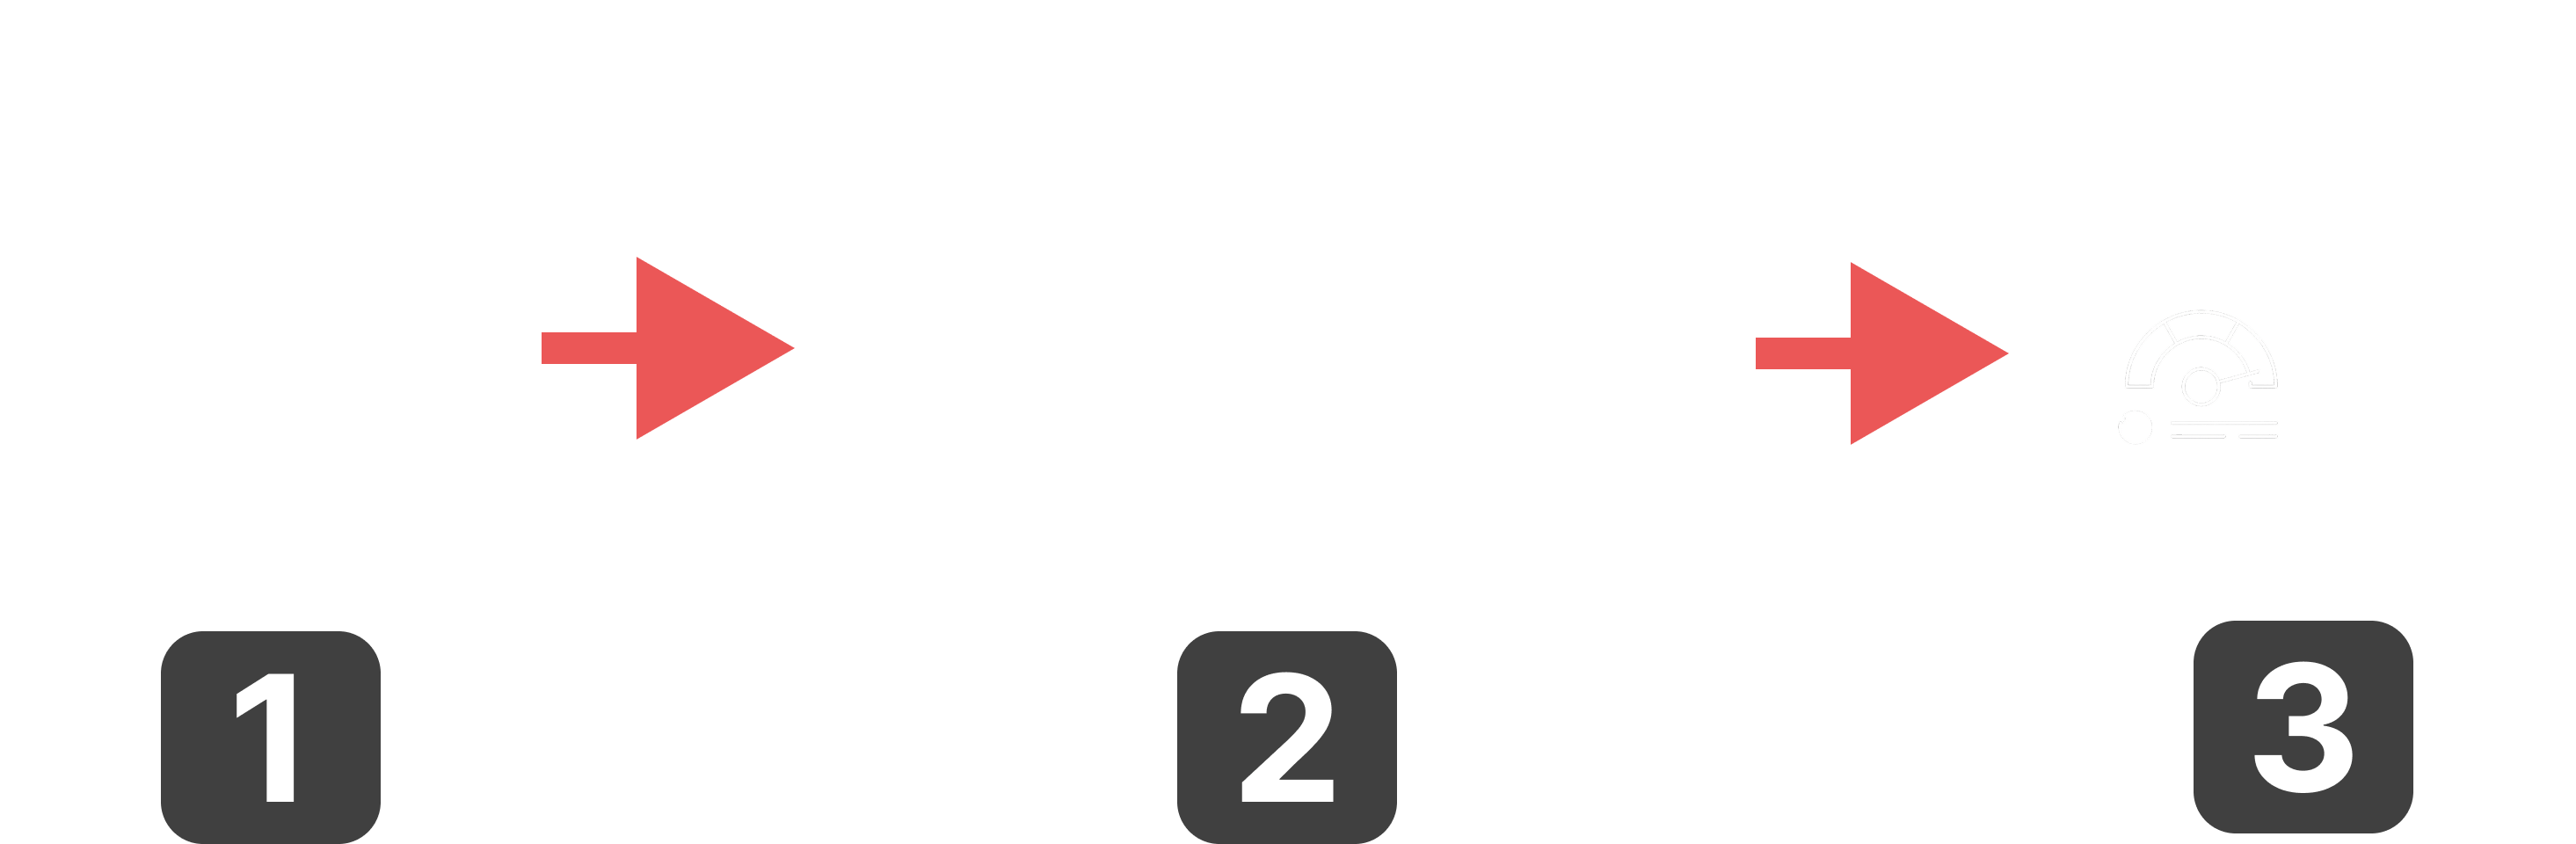
    1. The Uplift Capture app takes **high-speed video of an athlete's movement** using 1 or 2 iOS devices, and uploads those videos to the Uplift cloud for analysis.

    2. Using Uplift's proprietary AI-powered computer vision models, the athlete's movement is **reconstructed in full 3D**. Uplift's biomechanical analysis turns this 3D data into **kinematic metrics, velocities, movement flags, and more**.

    3. Uplift's web platform reports on the athlete's assessment results, surfacing **metrics, insights, and recommendations** to guide organizations and coaches to **measure athletic ability, fix movement inefficiencies, improve performance, and reduce injury risk**.
  </Accordion>

  <Accordion title="Supported devices and equipment" icon="mobile">
    Uplift Capture runs on **Apple iOS devices that support 240fps video capture**. Before getting started, confirm your devices meet our requirements.

    Getting solid captures and reliable results also requires **mounting your devices on tripods** with sturdy mounts. Review our list of recommended capture equipment to make your assessments as successful as possible.
  </Accordion>

  <Accordion title="Getting the Uplift Capture app" icon="download">
    <Columns cols={2}>
      <Column>
        **Download the Uplift Capture app** and install it on all devices you'll be using for Capture. After installing the app, **log into your account on both devices**. **Very important:** make sure you **allow permissions for the app to access the camera and microphone** and **discover devices on the local network**. We also recommend enabling automatic updates so you always have the latest features.
      </Column>

      <Column>
        <img src="https://mintcdn.com/upliftlabs/oV9tpj3Bprj6gcRa/images/guides/getting-started/uplift-capture-app-store-QR-code.png?fit=max&auto=format&n=oV9tpj3Bprj6gcRa&q=85&s=a4d2dcdd83926c9235166fd185bbde15" alt="" style={{display: 'block', margin: '0 auto', height: '400px'}} width="487" height="489" data-path="images/guides/getting-started/uplift-capture-app-store-QR-code.png" />

        <div style={{textAlign: 'center'}}>
          [Get the app](https://apps.apple.com/us/app/uplift-capture/id1501907981)
        </div>
      </Column>
    </Columns>
  </Accordion>

  <Accordion title="Creating your first athlete(s)" icon="user-plus">
    When you run your first assessment, you'll select a movement protocol, and an athlete you'd like to assess. While you can create an athlete profile on-the-fly in the app before starting an assessment, creating them ahead of time in the web app will save you time later. Log in to the web app at [platform.uplift.ai](http://platform.uplift.ai), click **Athletes** in the menu on the left, and click the **Add Athlete** button in the upper right to create athlete profiles.

    <img src="https://mintcdn.com/upliftlabs/oV9tpj3Bprj6gcRa/images/guides/getting-started/add-athlete-buttons.png?fit=max&auto=format&n=oV9tpj3Bprj6gcRa&q=85&s=6be98bc3a99937d58681db2af87f053f" alt="" style={{width: '400px', margin: '0 auto'}} width="616" height="142" data-path="images/guides/getting-started/add-athlete-buttons.png" />
  </Accordion>
</AccordionGroup>

## Running your first assessment

<AccordionGroup>
  <Accordion title="Before you begin" icon="hourglass-start">
    <Columns cols={2}>
      <Column>
        <Card title="Make sure your devices are ready" icon="mobile">
          * Fully charged

          * Logged into the same Uplift account

          * Connected to the same WiFi network
        </Card>

        Then gather your tripods, mounts, and any other capture equipment.
      </Column>

      <Column>
        <Card title="Make sure your environment is prepared" icon="cube">
          * Good lighting

          * No baggy clothing or all-black outfits

          * Space to capture the entire movement
        </Card>

        If your location does not have a solid WiFi connection, consider capturing in offline mode.
      </Column>
    </Columns>
  </Accordion>

  <Accordion title="Choosing your Assessment" icon="baseball-bat-ball">
    <Columns cols={2}>
      <Column>
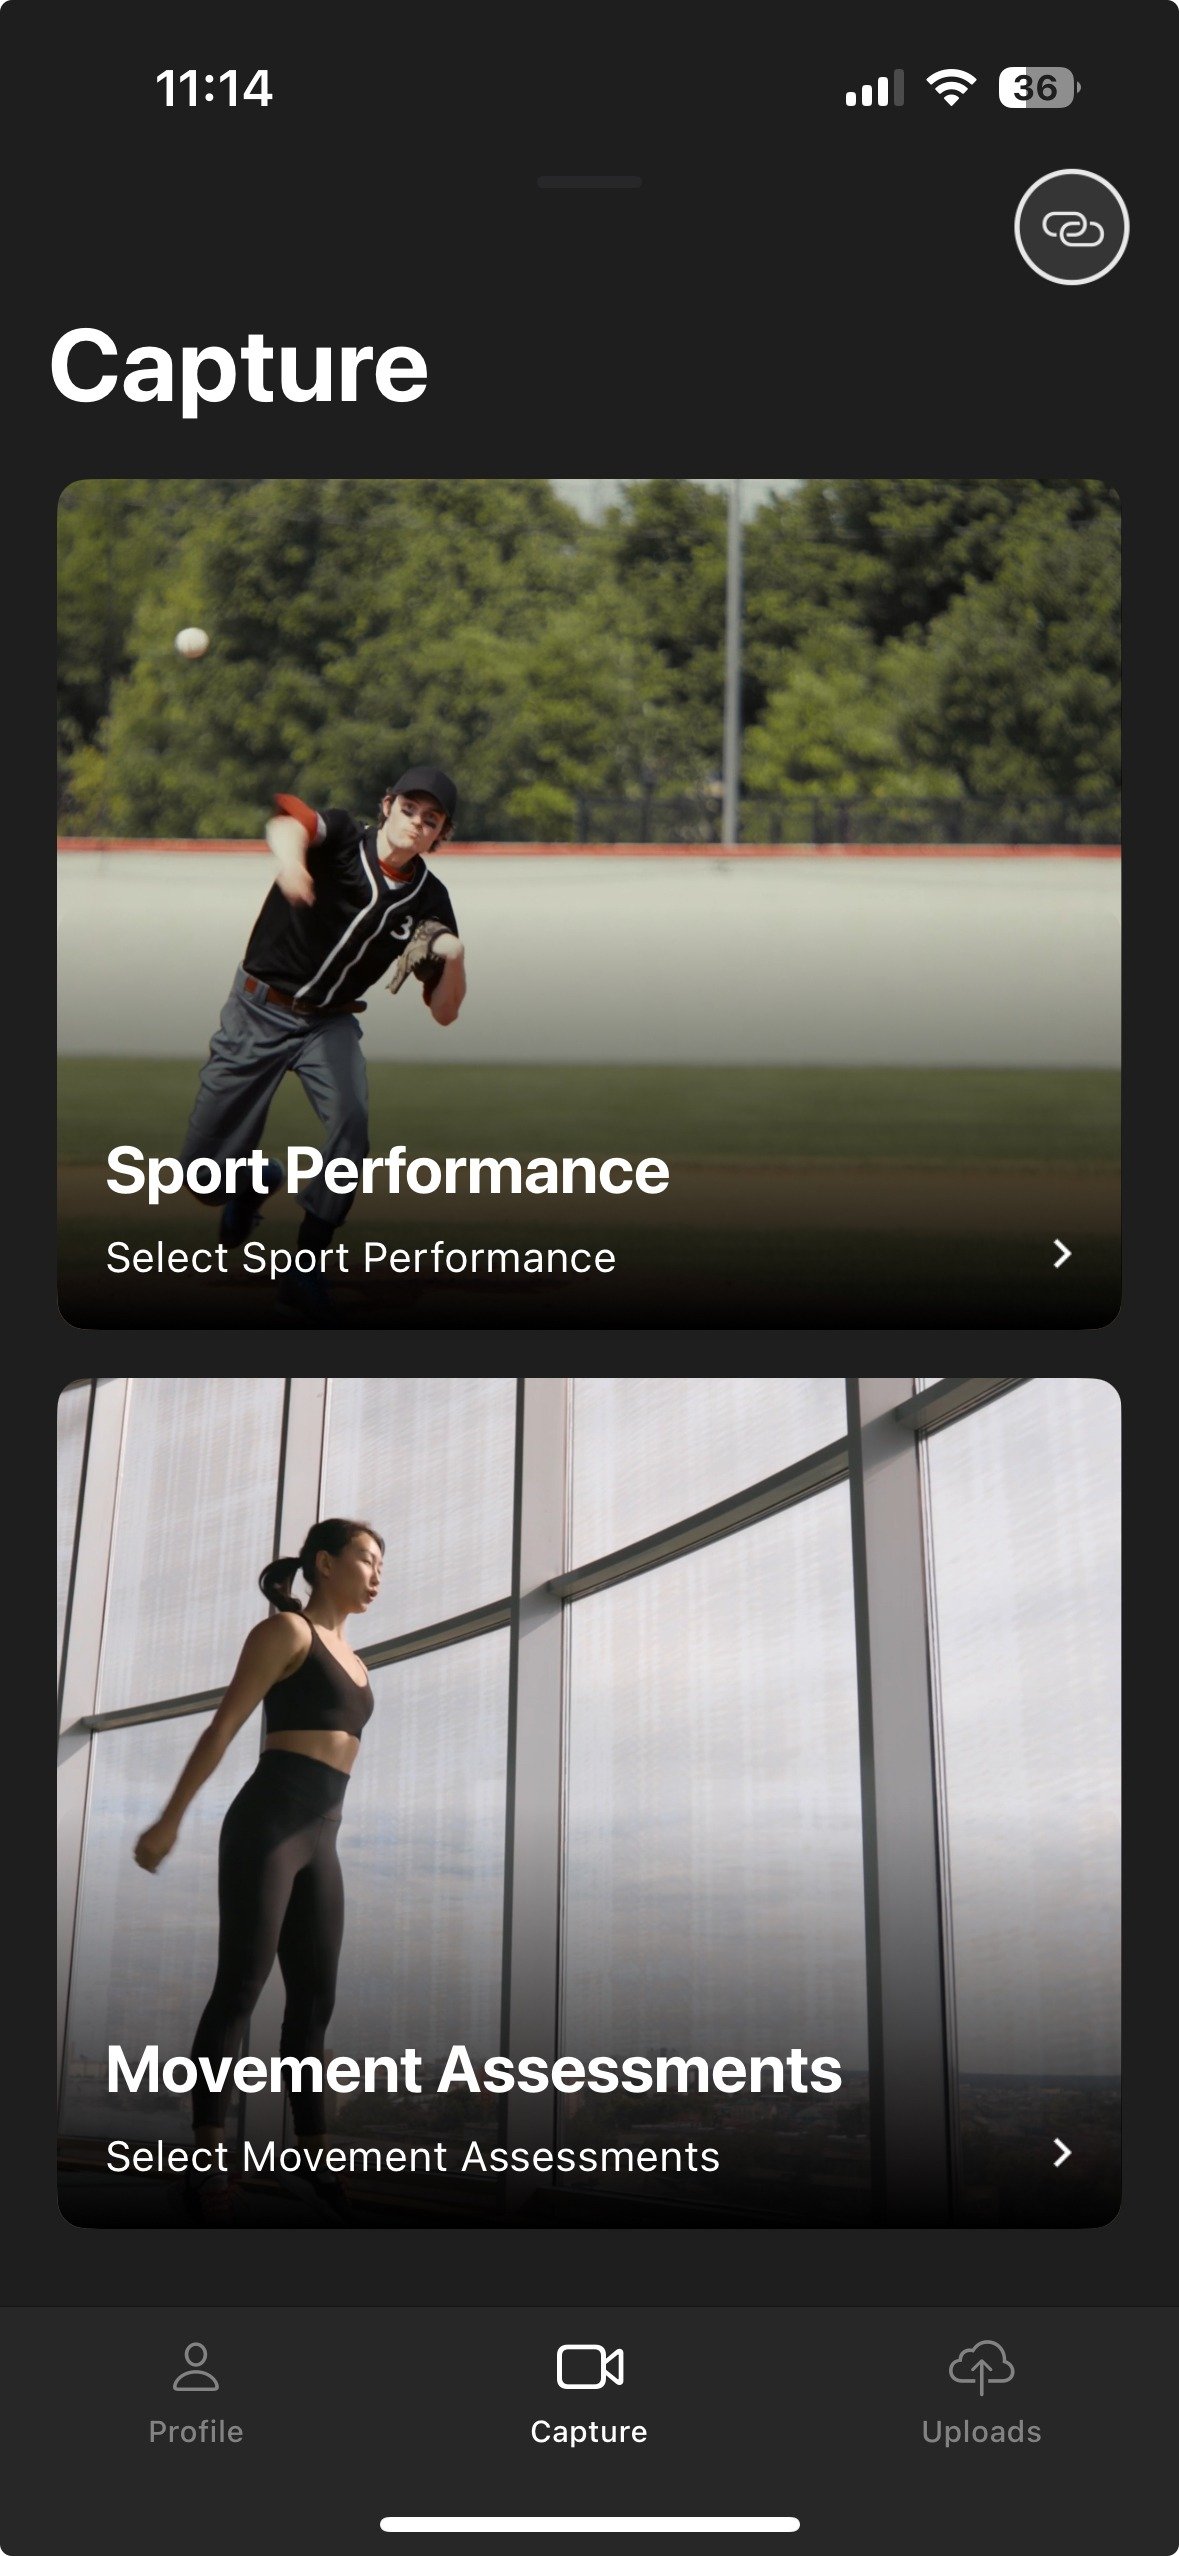
        Start by selecting your movement. Sports movements - like baseball swings or tennis serves - can be found under the **Sports Performance** option. General movements like squats, jumps, and functional range-of-motion tests are found under **Movement Assessments**.

        Some movements can also be captured with a single camera. This step is where you'll choose between 1-camera and 2-camera capture. Check out our up-to-date list of movements available in 1-camera capture.

        After choosing your movement, select the athlete you'll be assessing (or create a new athlete profile).

        For handed movements like pitching, swinging, or serves, **make sure you select the proper handedness** - it will affect your camera setup instructions in the next step.
      </Column>

      <Column>
        <img src="https://mintcdn.com/upliftlabs/CkKKCENvL__d5sP8/images/guides/getting-started/app-home.jpeg?fit=max&auto=format&n=CkKKCENvL__d5sP8&q=85&s=606ca0462318c583e000bd892d9298b2" alt="" style={{display: 'block', margin: '0 auto', height: '400px'}} width="1179" height="2556" data-path="images/guides/getting-started/app-home.jpeg" />
      </Column>
    </Columns>
  </Accordion>

  <Accordion title="Setting up devices" icon="camera">
    Now you'll be guided through camera setup instructions. Camera setup follows these steps:

    1. Choosing your orientation (landscape vs. portrait)

    2. Choosing your preferred camera positions

    3. Placing your cameras so they can see the entire movement

    4. Measuring and entering the distance from each camera to the athlete's position

    5. Adjusting the camera's tilt to ensure a level video

    This video demonstrates proper camera setup - watching it before your first session will help you set up like a pro!

    Once your devices show **Complete**, you're ready to start recording!

    <div style={{textAlign: 'center'}}>
      <iframe width="560" height="315" src="https://www.youtube.com/embed/WAIq6WY4Jok?si=5p-gun1h_uQKtSxF" title="YouTube video player" frameborder="0" allow="accelerometer; autoplay; clipboard-write; encrypted-media; gyroscope; picture-in-picture; web-share" referrerpolicy="strict-origin-when-cross-origin" allowfullscreen />
    </div>
  </Accordion>

  <Accordion title="Capturing movements" icon="video">
    <Columns cols={2}>
      <Column>
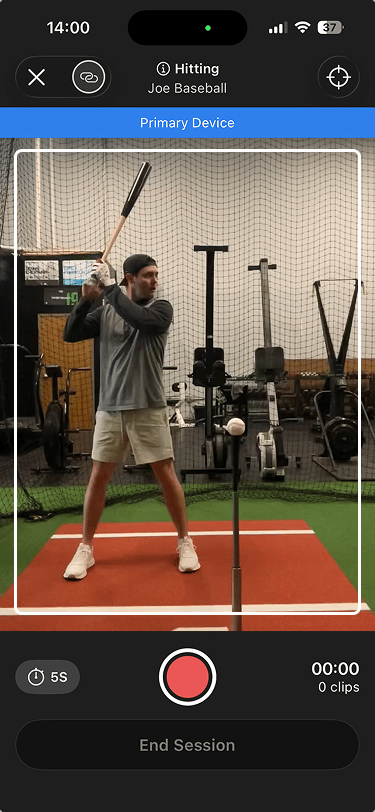
        To assess an athlete's movement, you'll need to record them performing the movement. This is as simple as recording one clip for each rep. The number of reps you include in an assessment is up to you, but **most coaches prefer to capture at least 5**.

        **Note:** we recommend controlling recording using either a bluetooth clicker or a remote control device for even more control over your session.
      </Column>

      <Column>
        <img src="https://mintcdn.com/upliftlabs/oxOA0DSYqVlKoTZw/images/guides/performing-an-assessment/recording-idle.png?fit=max&auto=format&n=oxOA0DSYqVlKoTZw&q=85&s=ddb520c2c11a895ace439ae60a070e48" alt="" style={{display: 'block', margin: '0 auto', height: '400px'}} width="375" height="812" data-path="images/guides/performing-an-assessment/recording-idle.png" />
      </Column>
    </Columns>
  </Accordion>

  <Accordion title="Using Auto-Capture" icon="bolt">
    Some movements and setups now support **Auto-Capture**, which means you don't have to manually start and stop the video recording. In order to use Auto-Capture:

    1. Tap the timer option and select **auto-capture** from the list.

    2. When an athlete is detected, the indicator at the bottom of the screen will turn green.

    3. After each swing/jump/squat/etc. the video is trimmed and queued for upload.

    <div style={{textAlign: 'center'}}>
      <iframe width="560" height="315" src="https://www.youtube.com/embed/UmxJuBfBFfI?si=yzt0faE8ui-lun2a" title="YouTube video player" frameborder="0" allow="accelerometer; autoplay; clipboard-write; encrypted-media; gyroscope; picture-in-picture; web-share" referrerpolicy="strict-origin-when-cross-origin" allowfullscreen />
    </div>
  </Accordion>

  <Accordion title="Finishing your assessment" icon="flag">
    <Columns cols={2}>
      <Column>
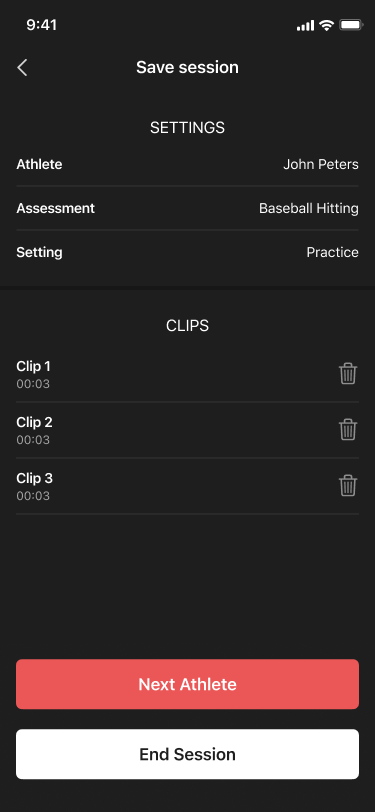
        When you've captured everything you need, tap **End Session**. You're done! If you're recording another assessment right away, select **Next Athlete**. If you're recording assessments back-to-back and aren't moving the cameras, you can skip setup using the "keep current setup" option. By default, videos start uploading to the cloud to be processed as soon as they are taken - so by the time you finish your assessment, some captures may already be ready to review!
      </Column>

      <Column>
        <img src="https://mintcdn.com/upliftlabs/oxOA0DSYqVlKoTZw/images/guides/performing-an-assessment/assessment-end-session.png?fit=max&auto=format&n=oxOA0DSYqVlKoTZw&q=85&s=02323162d65c2353963d18d110d64dfa" alt="" style={{display: 'block', margin: '0 auto', height: '400px'}} width="375" height="812" data-path="images/guides/performing-an-assessment/assessment-end-session.png" />
      </Column>
    </Columns>
  </Accordion>

  <Accordion title="Uploading videos" icon="cloud-arrow-up">
    <Columns cols={2}>
      <Column>
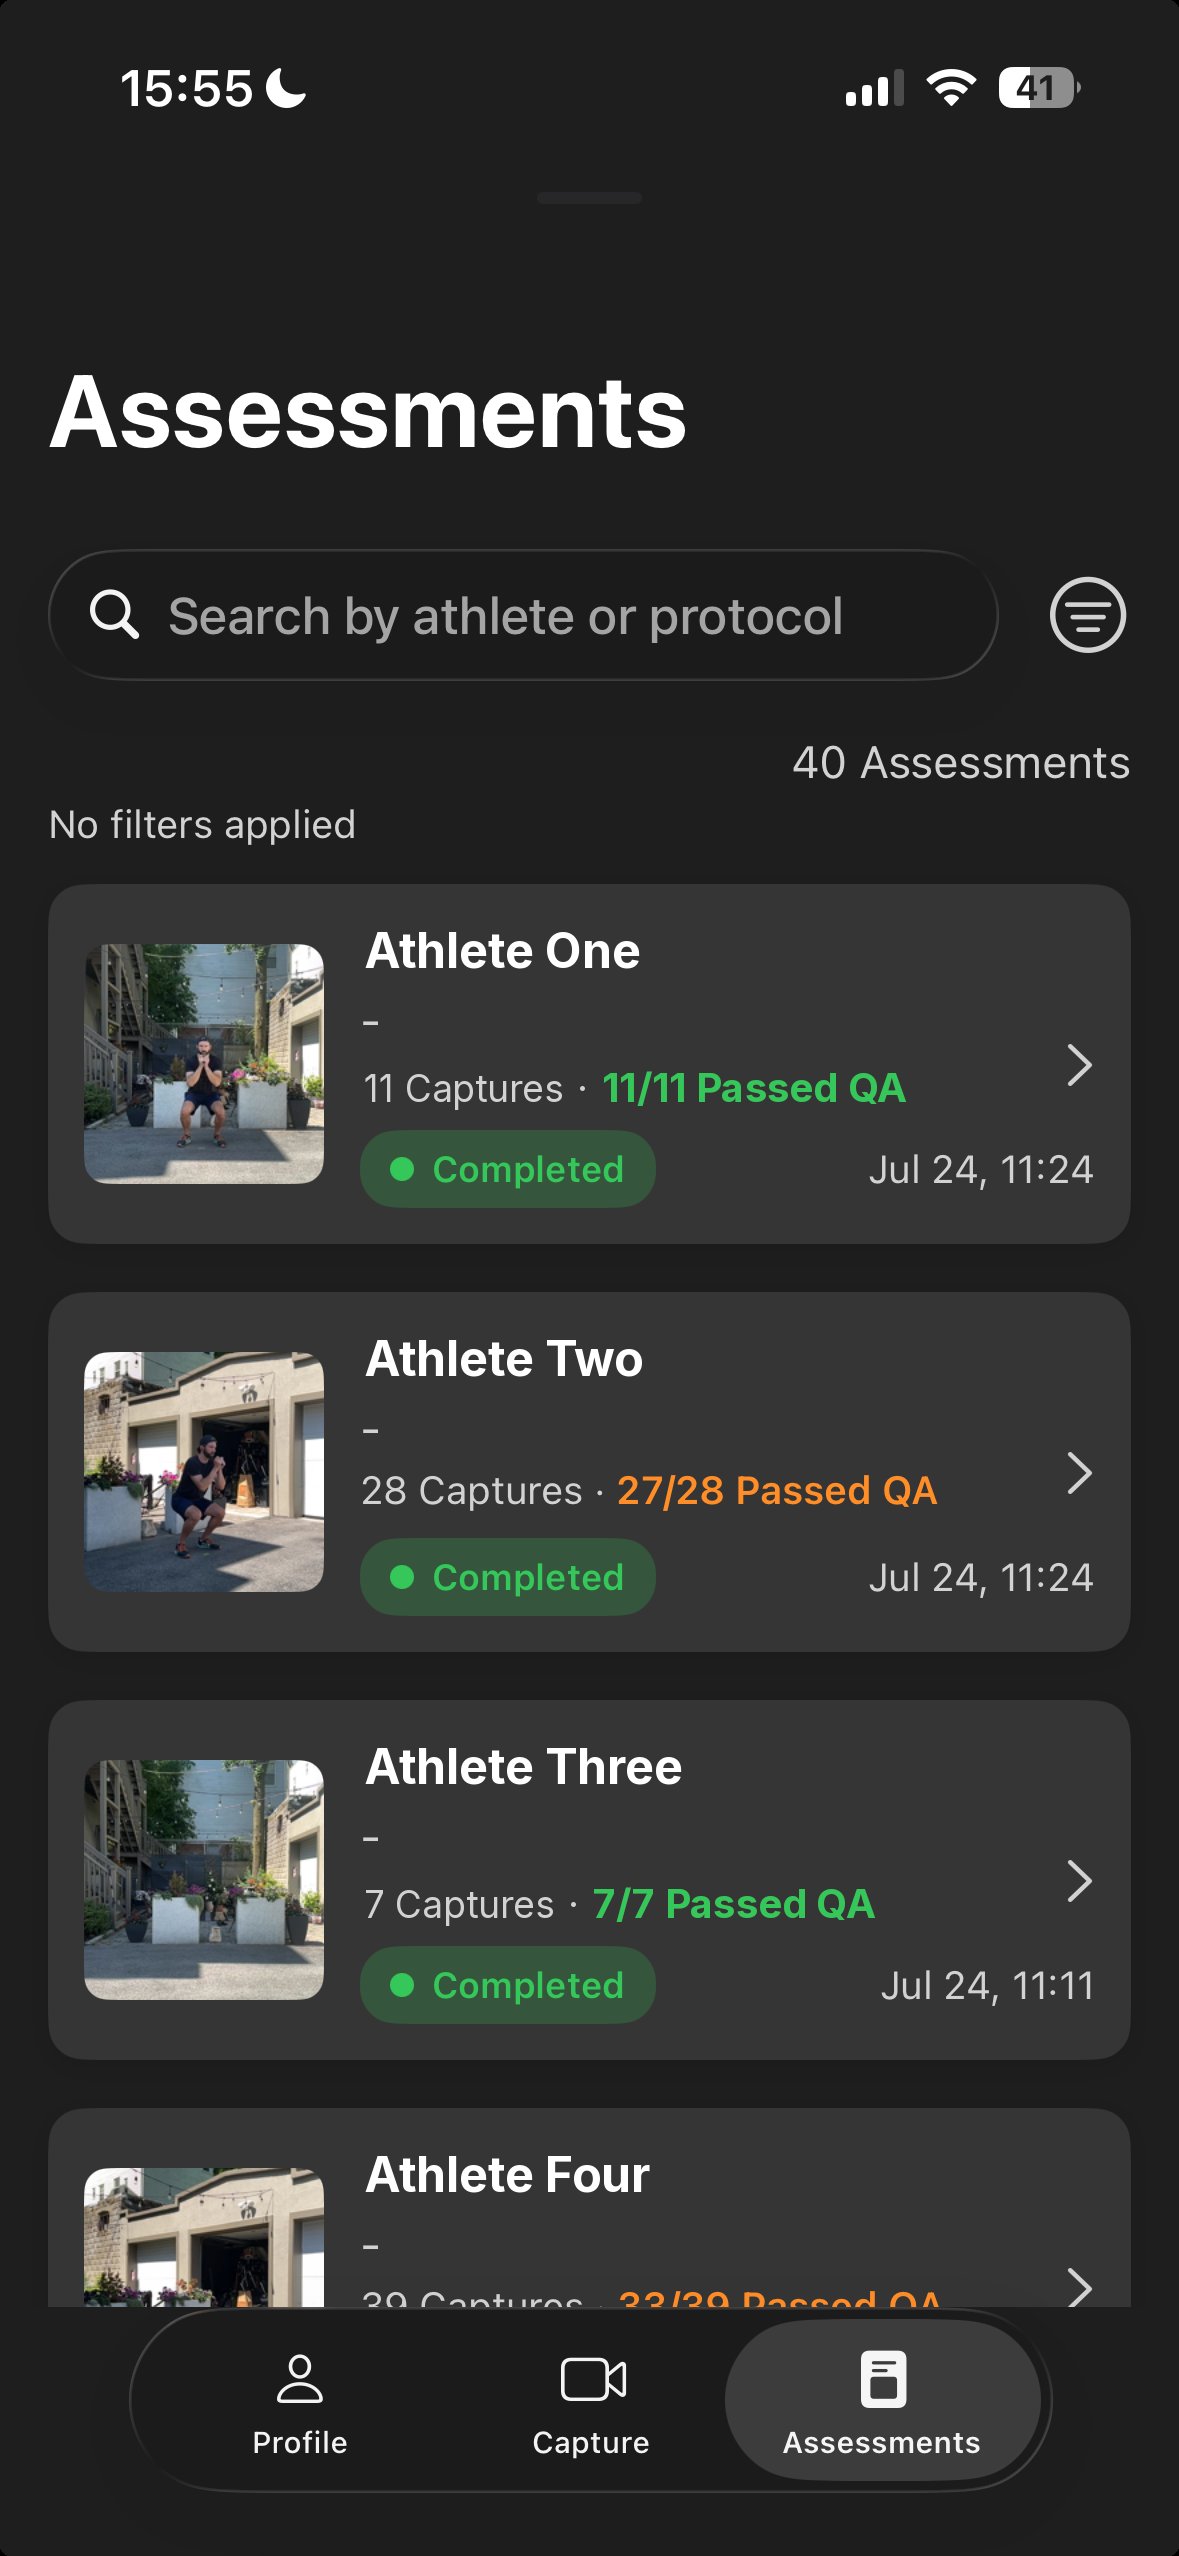
        By default, videos begin uploading automatically as soon as each clip is recorded - so by the time you finish your assessment, some captures may already be ready to review! You can monitor upload status in the **Assessments** tab. If you don't have a solid network connection, you can capture in offline mode and start the upload when you're back in range.
      </Column>

      <Column>
        <img src="https://mintcdn.com/upliftlabs/oV9tpj3Bprj6gcRa/images/guides/performing-an-assessment/app-assessment-tab.png?fit=max&auto=format&n=oV9tpj3Bprj6gcRa&q=85&s=18984bf7af84005a446a3d24a2dca337" alt="" style={{display: 'block', margin: '0 auto', height: '400px'}} width="1179" height="2556" data-path="images/guides/performing-an-assessment/app-assessment-tab.png" />
      </Column>
    </Columns>
  </Accordion>
</AccordionGroup>

## Reviewing assessment results

<AccordionGroup>
  <Accordion title="The Assessment view" icon="eye">
    Results are available in the Uplift web platform at [platform.uplift.ai](https://platform.uplift.ai) as soon as your videos finish processing. Click **Assessments** in the menu for a list of all your recent assessments. You can use the search or filters to find a specific assessment.

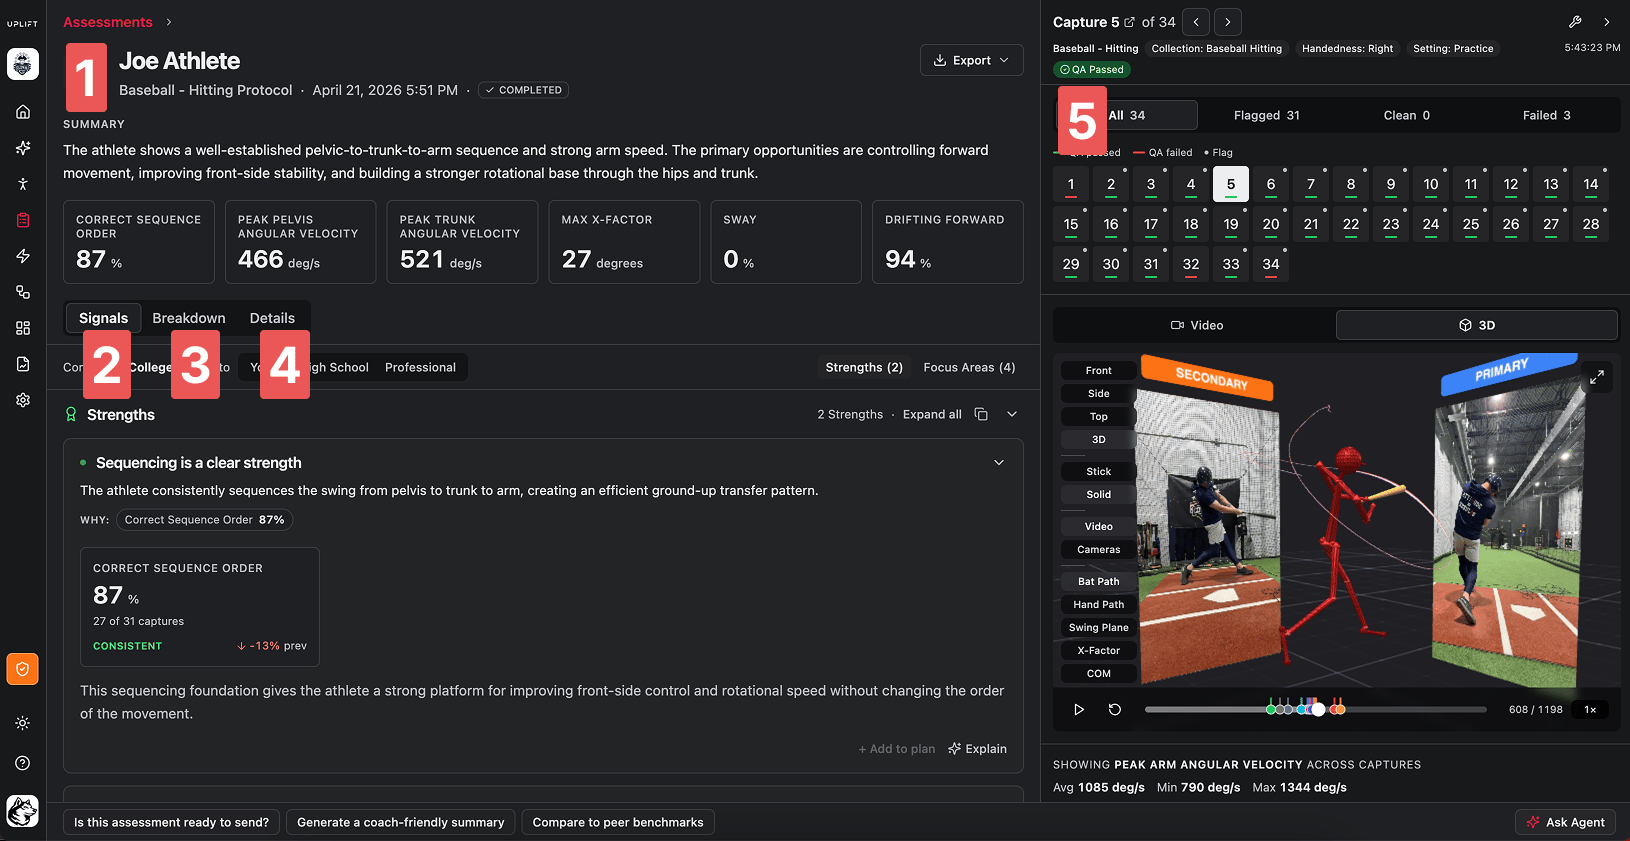
    Clicking an assessment in the list will open that assessment's details, which include the most important data, metrics, and insights about the assessment. This view contains the following sections:

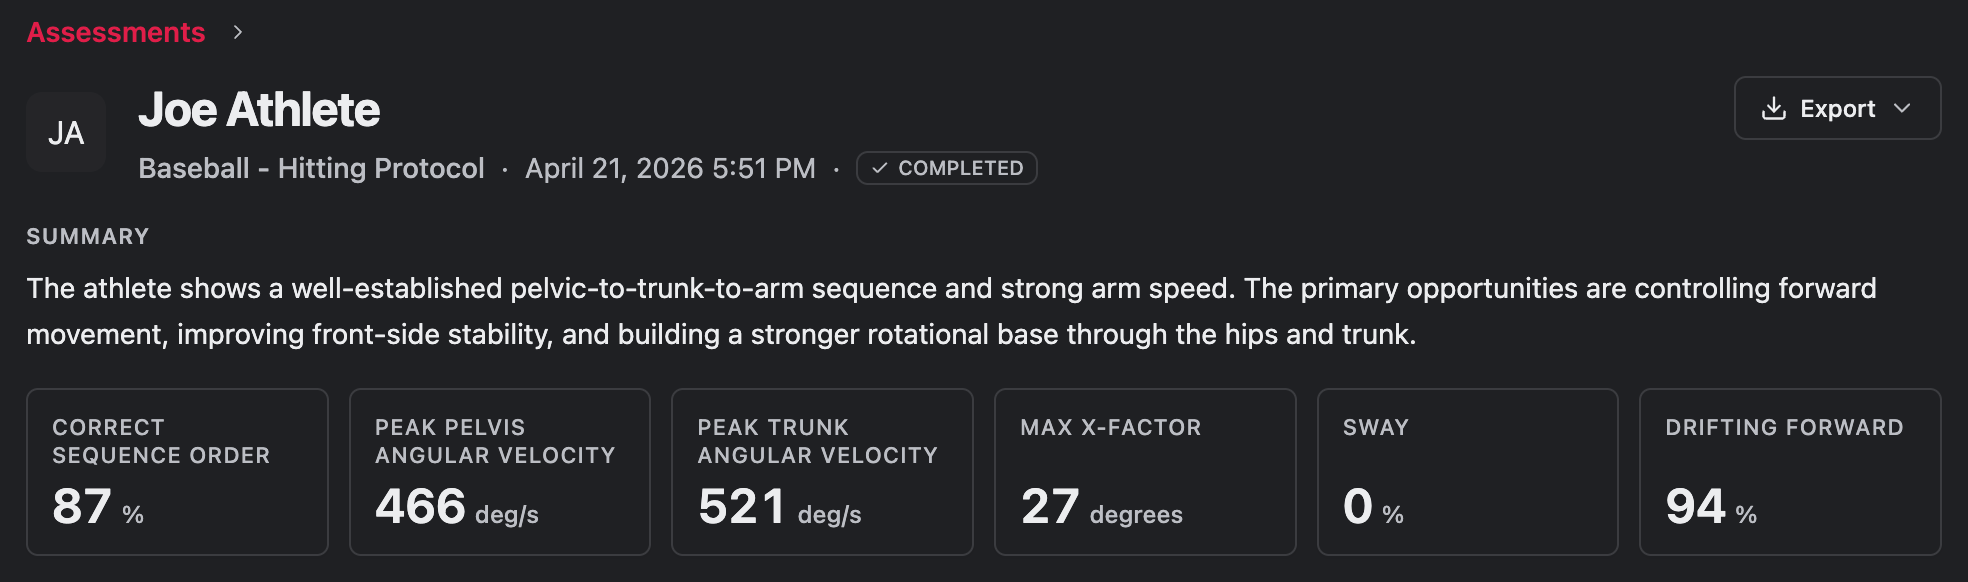
    1. **Assessment summary:** Basic information like athlete, date, and status; plus quick summary metrics.

    2. **Signals:** Insight-level results view surfacing strengths, focus areas, and drill recommendations.

    3. **Breakdown:** Data-focused results view with charts and metrics.

    4. **Details:** Info on each capture, devices used, QA status, and more.

    5. **Capture viewer:** Video + 3D interactive view of each capture, highlighting events and movement flags.

    <img src="https://mintcdn.com/upliftlabs/zrkhfCm1PbAiD5WS/images/guides/reviewing-assessment-results/assessment-all-annotated.png?fit=max&auto=format&n=zrkhfCm1PbAiD5WS&q=85&s=29f2cbf0a6ac7f9a87a36fbb5caa1eda" alt="" style={{display: 'block', margin: '0 auto'}} width="1630" height="841" data-path="images/guides/reviewing-assessment-results/assessment-all-annotated.png" />

    We'll cover each section in detail below.
  </Accordion>

  <Accordion title="Assessment summary" icon="file-lines">
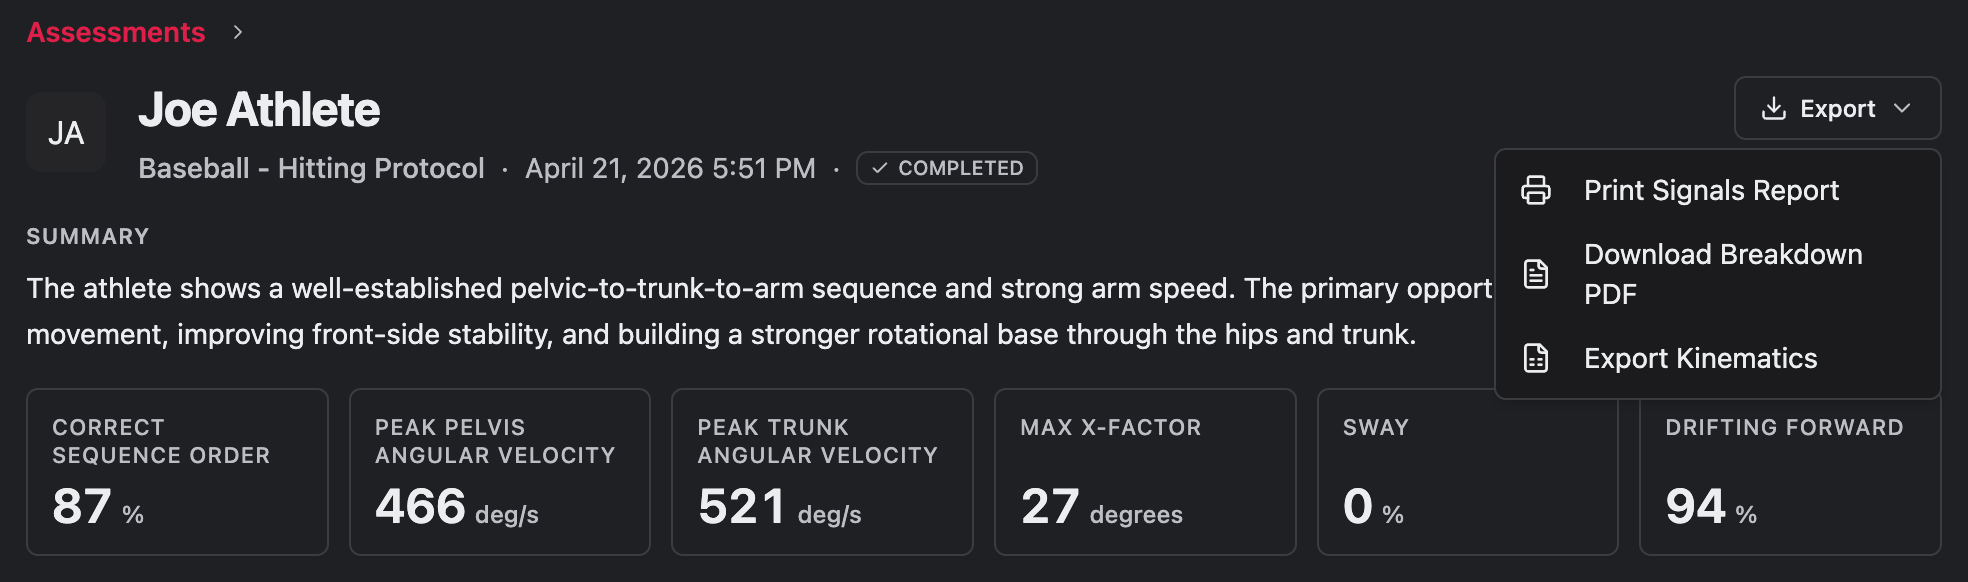
    The **assessment summary** includes all the basic information about the assessment - the date, the athlete, the protocol - as well as a text summary. Many assessments also now have the most trackable metrics surfaced at the very top - things like kinematic sequence, jump height, or important movement flags. Below the summary are 3 tabs - **Signals**, **Breakdown**, and **Details**. Not every assessment has all 3; however, we're working on getting every one of our most-used movements in these views.

    <img src="https://mintcdn.com/upliftlabs/zrkhfCm1PbAiD5WS/images/guides/reviewing-assessment-results/assessment-summary.png?fit=max&auto=format&n=zrkhfCm1PbAiD5WS&q=85&s=da418765d545f243fef2e8534513881b" alt="" style={{display: 'block', margin: '0 auto'}} width="1968" height="582" data-path="images/guides/reviewing-assessment-results/assessment-summary.png" />
  </Accordion>

  <Accordion title="Signals" icon="satellite-dish">
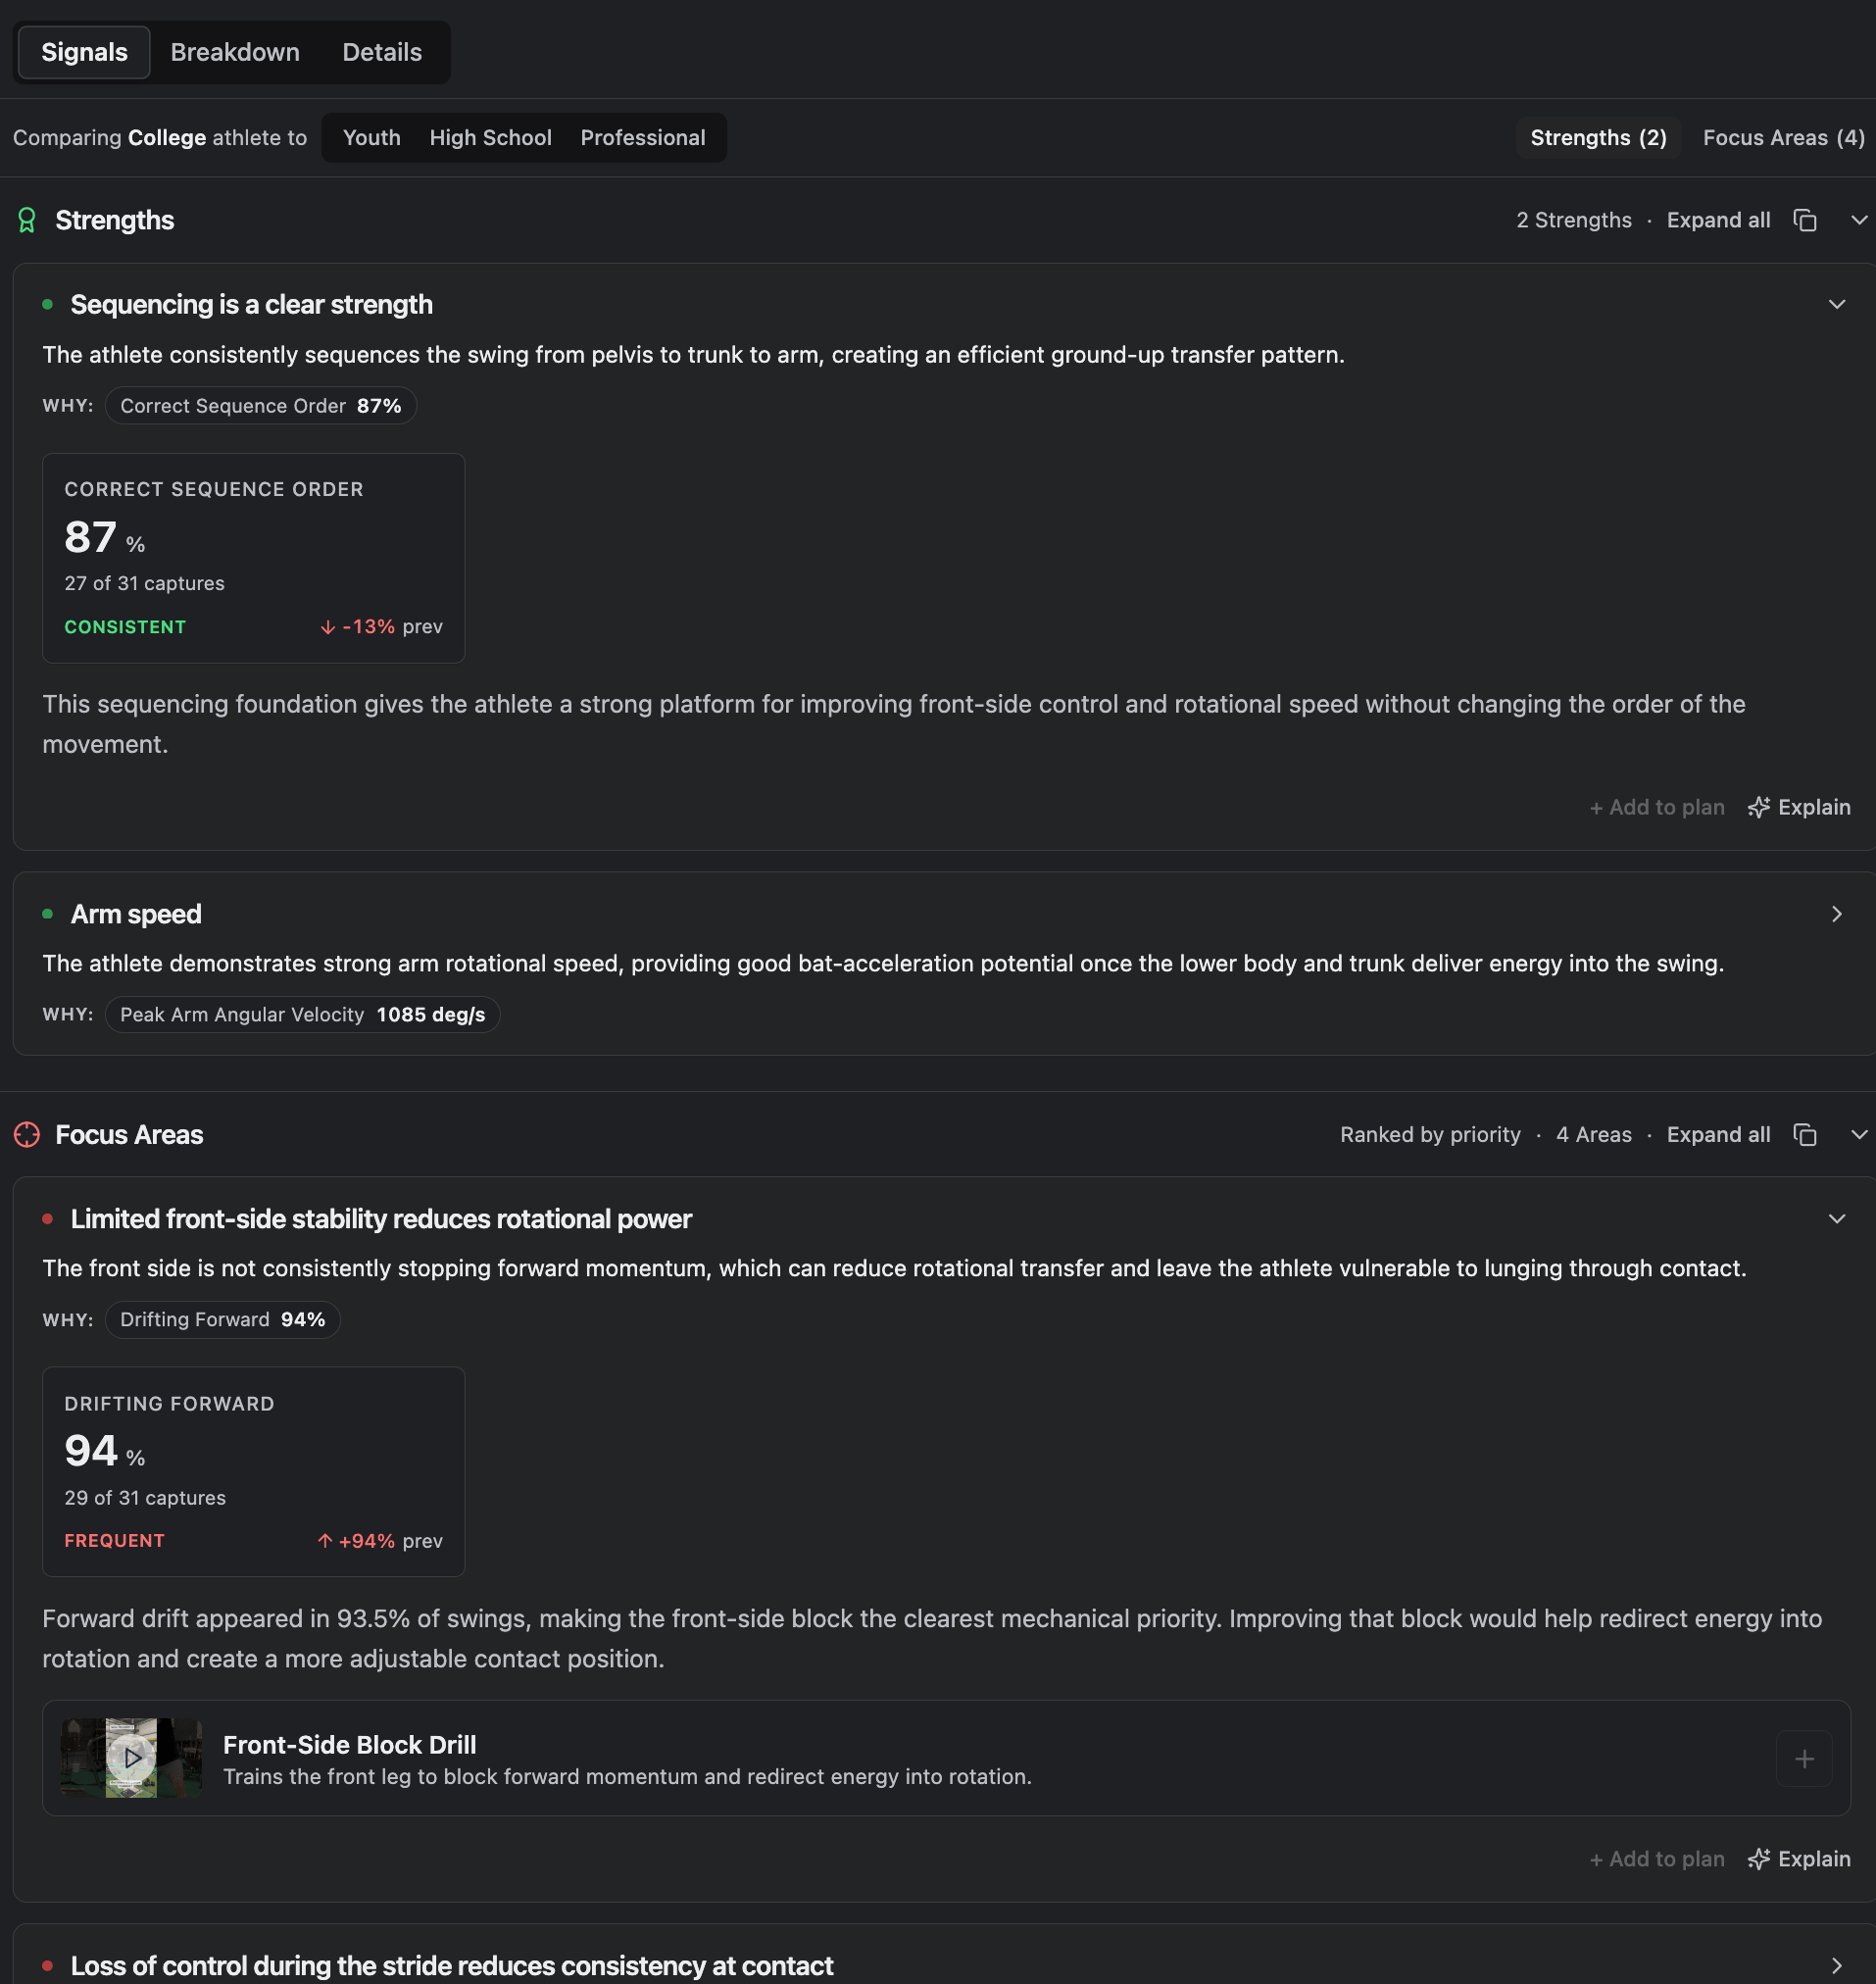
    The first tab, **Signals**, is our AI-generated movement analysis. It reviews all the captures in an assessment and produces the following:

    * **Strengths:** what the athlete did well in their movements

    * **Focus Areas:** movement patterns or mechanics they can correct or improve

    * **Drills:** recommended drills or interventions to work on their focus areas. *NOTE:* movement assessment movements do not currently include drill recommendations.

    <img src="https://mintcdn.com/upliftlabs/zrkhfCm1PbAiD5WS/images/guides/reviewing-assessment-results/assessment-signals.png?fit=max&auto=format&n=zrkhfCm1PbAiD5WS&q=85&s=a42b1cdb083e346badc9bab2edab6037" alt="" style={{display: 'block', margin: '0 auto'}} width="1914" height="2024" data-path="images/guides/reviewing-assessment-results/assessment-signals.png" />
  </Accordion>

  <Accordion title="Breakdown" icon="chart-line">
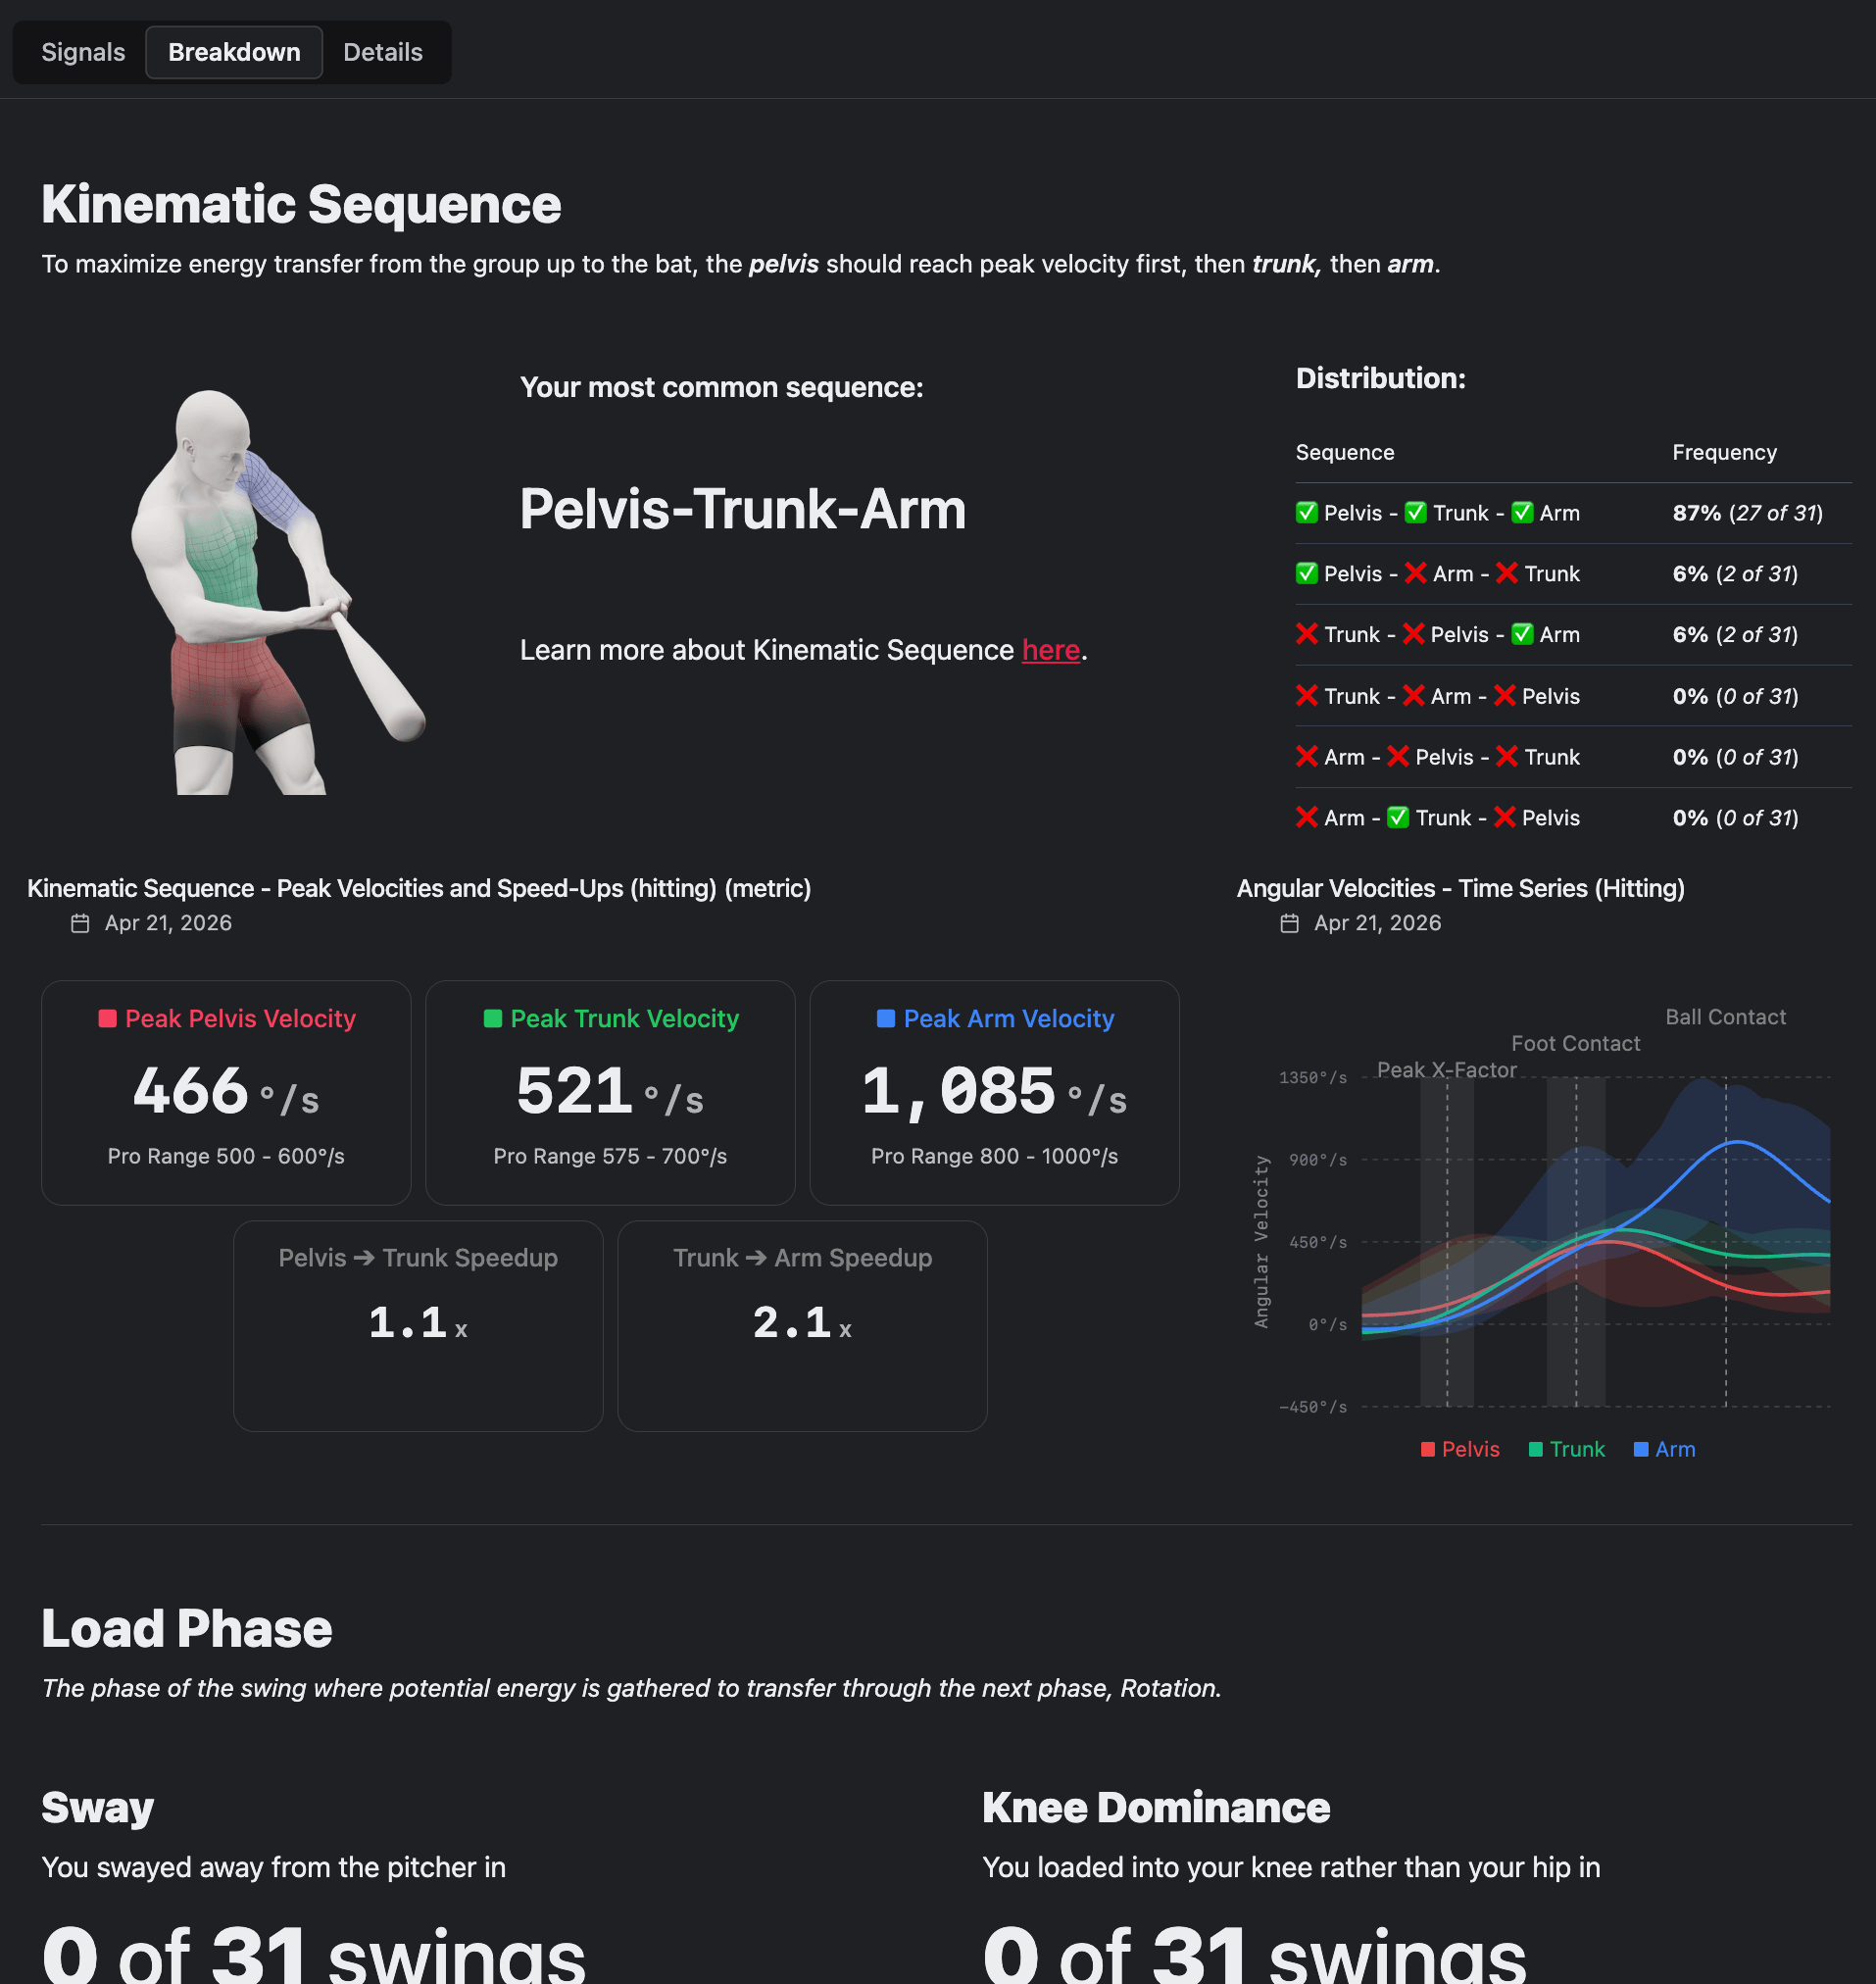
    The **Breakdown** tab is a more data-centric look at the assessment results. Each movement has its own tailored report highlighting the most relevant data for that movement. A few examples include:

    * **Baseball and softball:** Kinematic sequence and peak velocities, trunk position, stride length

    * **Jumps and squats:** Jump height, knee valgus, range of motion limitations

    * **All movements:** whether the athlete got in any sub-optimal positions that can be corrected

    <img src="https://mintcdn.com/upliftlabs/zrkhfCm1PbAiD5WS/images/guides/reviewing-assessment-results/assessment-breakdown.png?fit=max&auto=format&n=zrkhfCm1PbAiD5WS&q=85&s=1179eb776b76bafe5d2147c8250957bd" alt="" style={{display: 'block', margin: '0 auto'}} width="1914" height="2024" data-path="images/guides/reviewing-assessment-results/assessment-breakdown.png" />
  </Accordion>

  <Accordion title="Details" icon="circle-info">
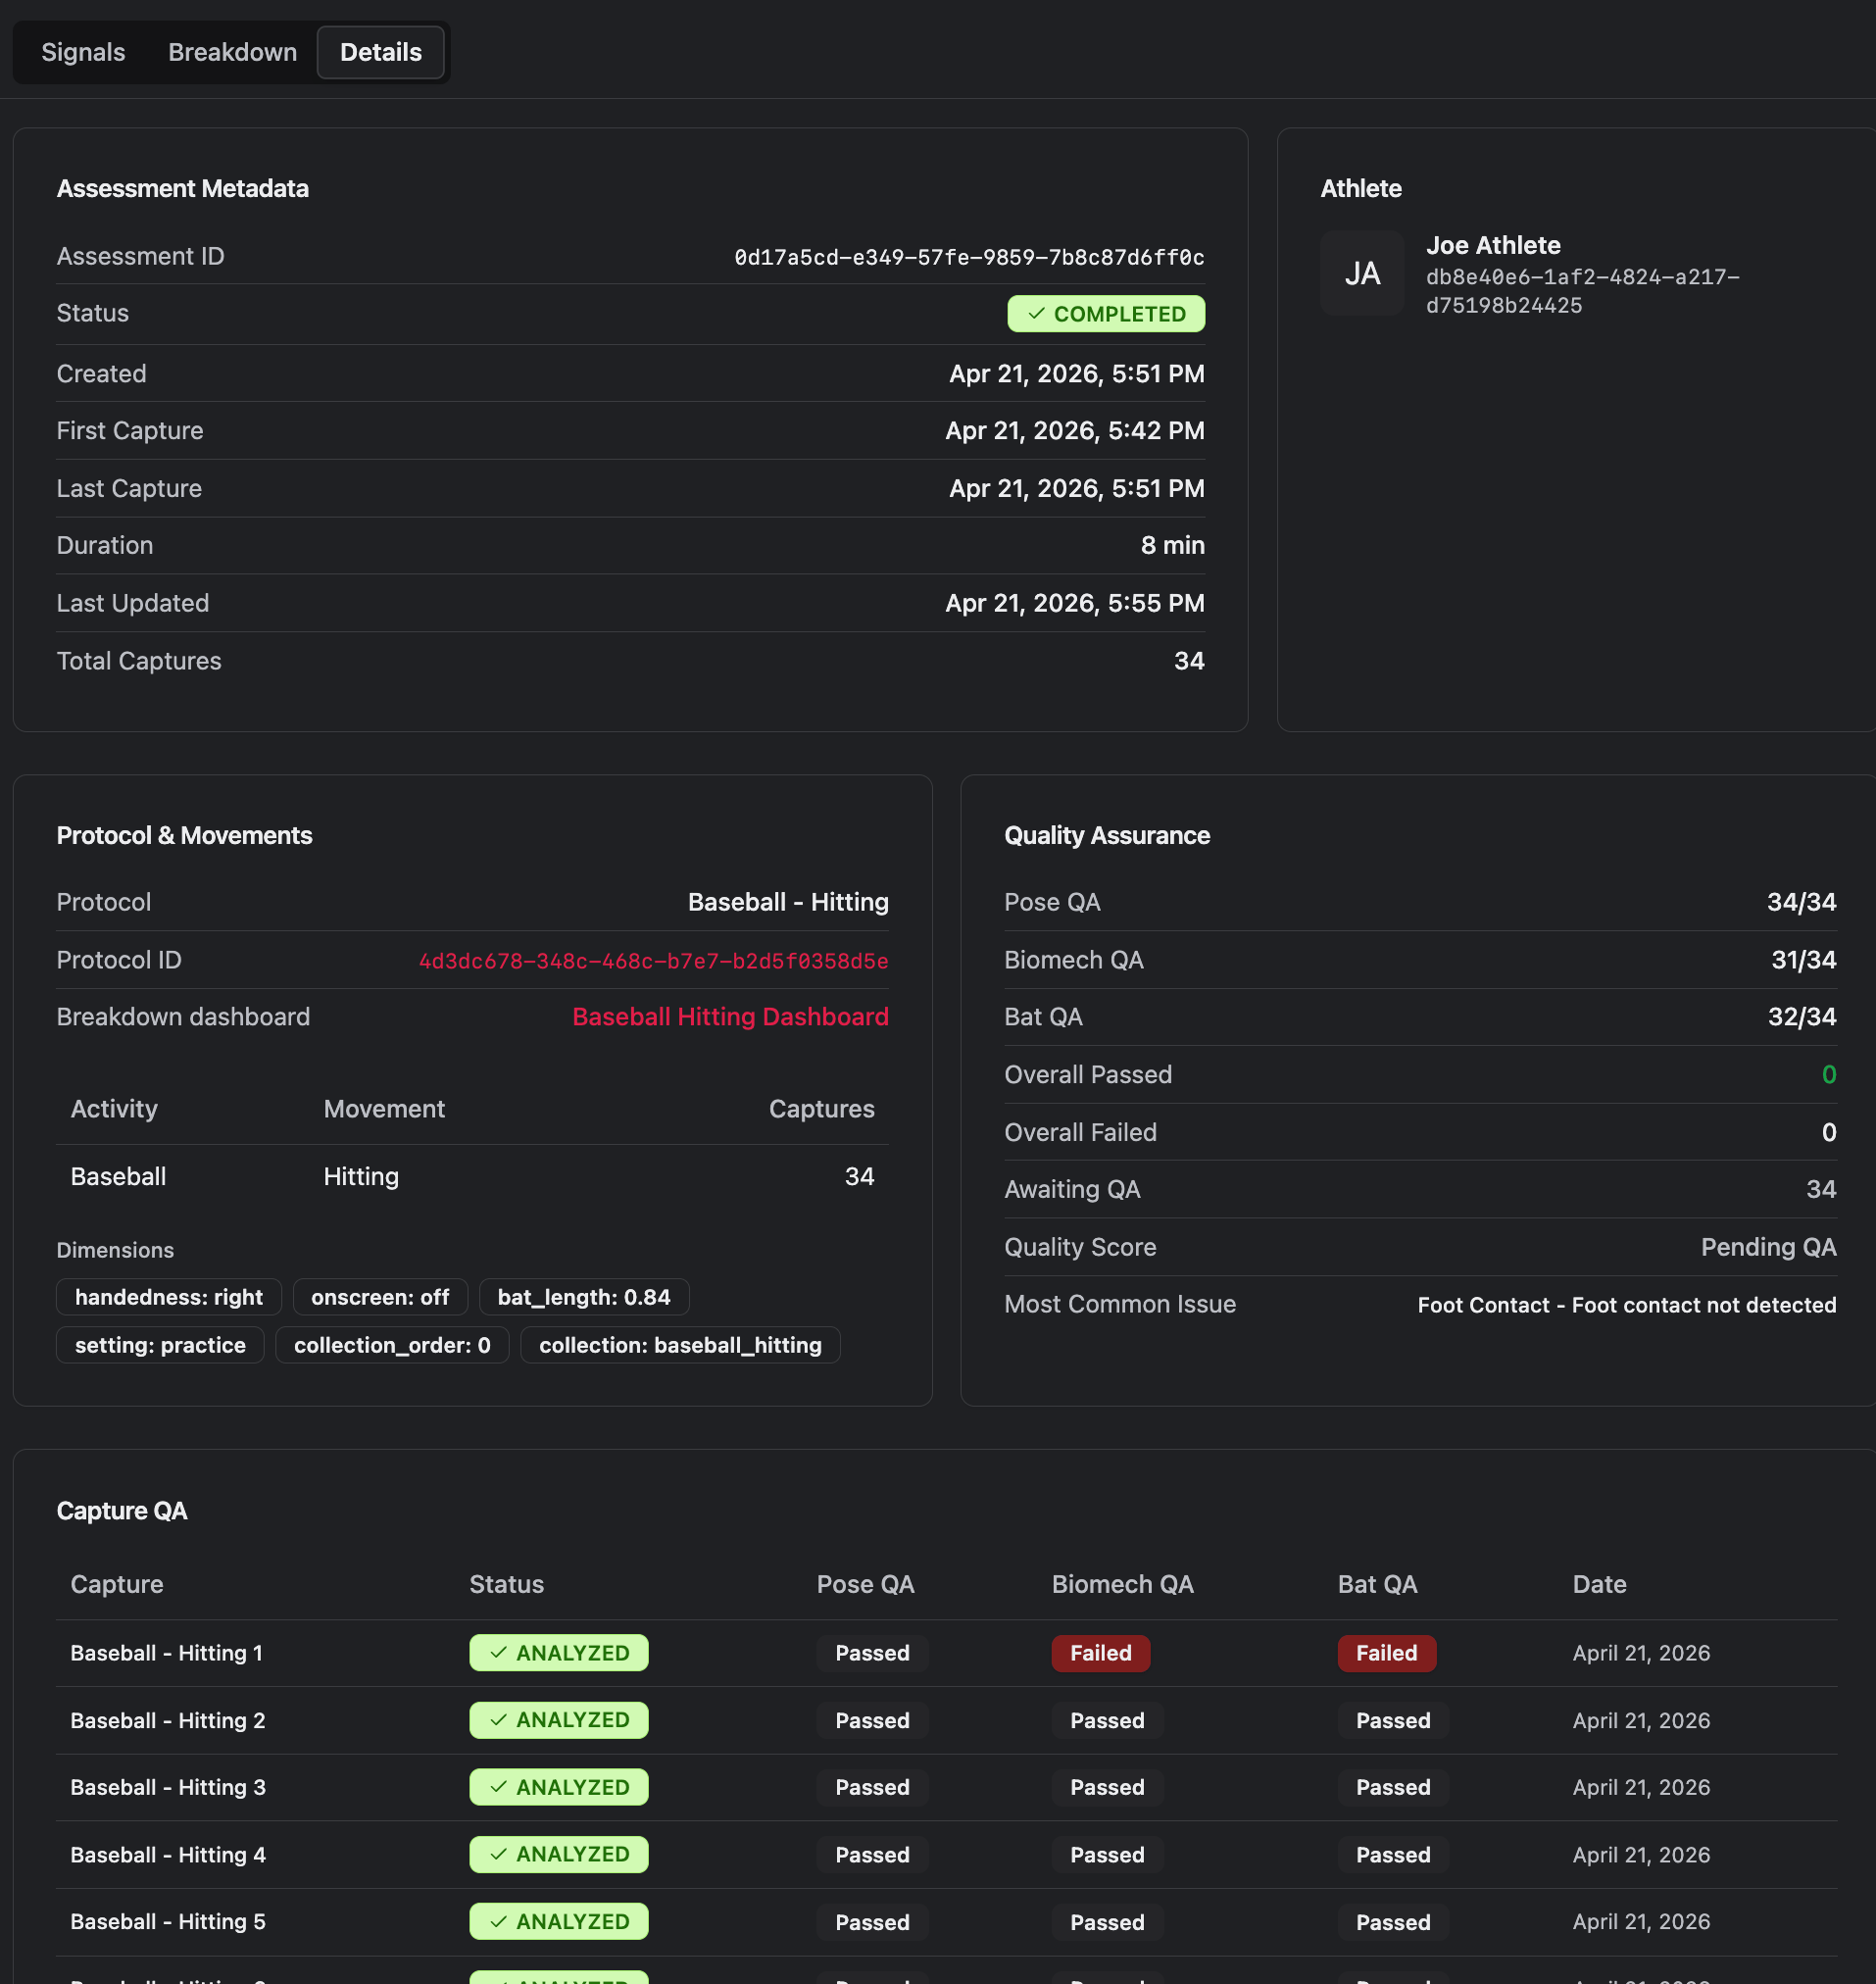
    The **Details** tab contains information about the session, including:

    * Attributes like capture times, handedness, and session IDs

    * Technical details like device models, average frame rates, and device orientation

    * How many captures passed or failed QA, and why

    <img src="https://mintcdn.com/upliftlabs/zrkhfCm1PbAiD5WS/images/guides/reviewing-assessment-results/assessment-details.png?fit=max&auto=format&n=zrkhfCm1PbAiD5WS&q=85&s=380bce25c7365bf32236f807827ab08c" alt="" style={{display: 'block', margin: '0 auto'}} width="1914" height="2024" data-path="images/guides/reviewing-assessment-results/assessment-details.png" />
  </Accordion>

  <Accordion title="Capture viewer" icon="tv">
    <Columns cols={2}>
      <Column>
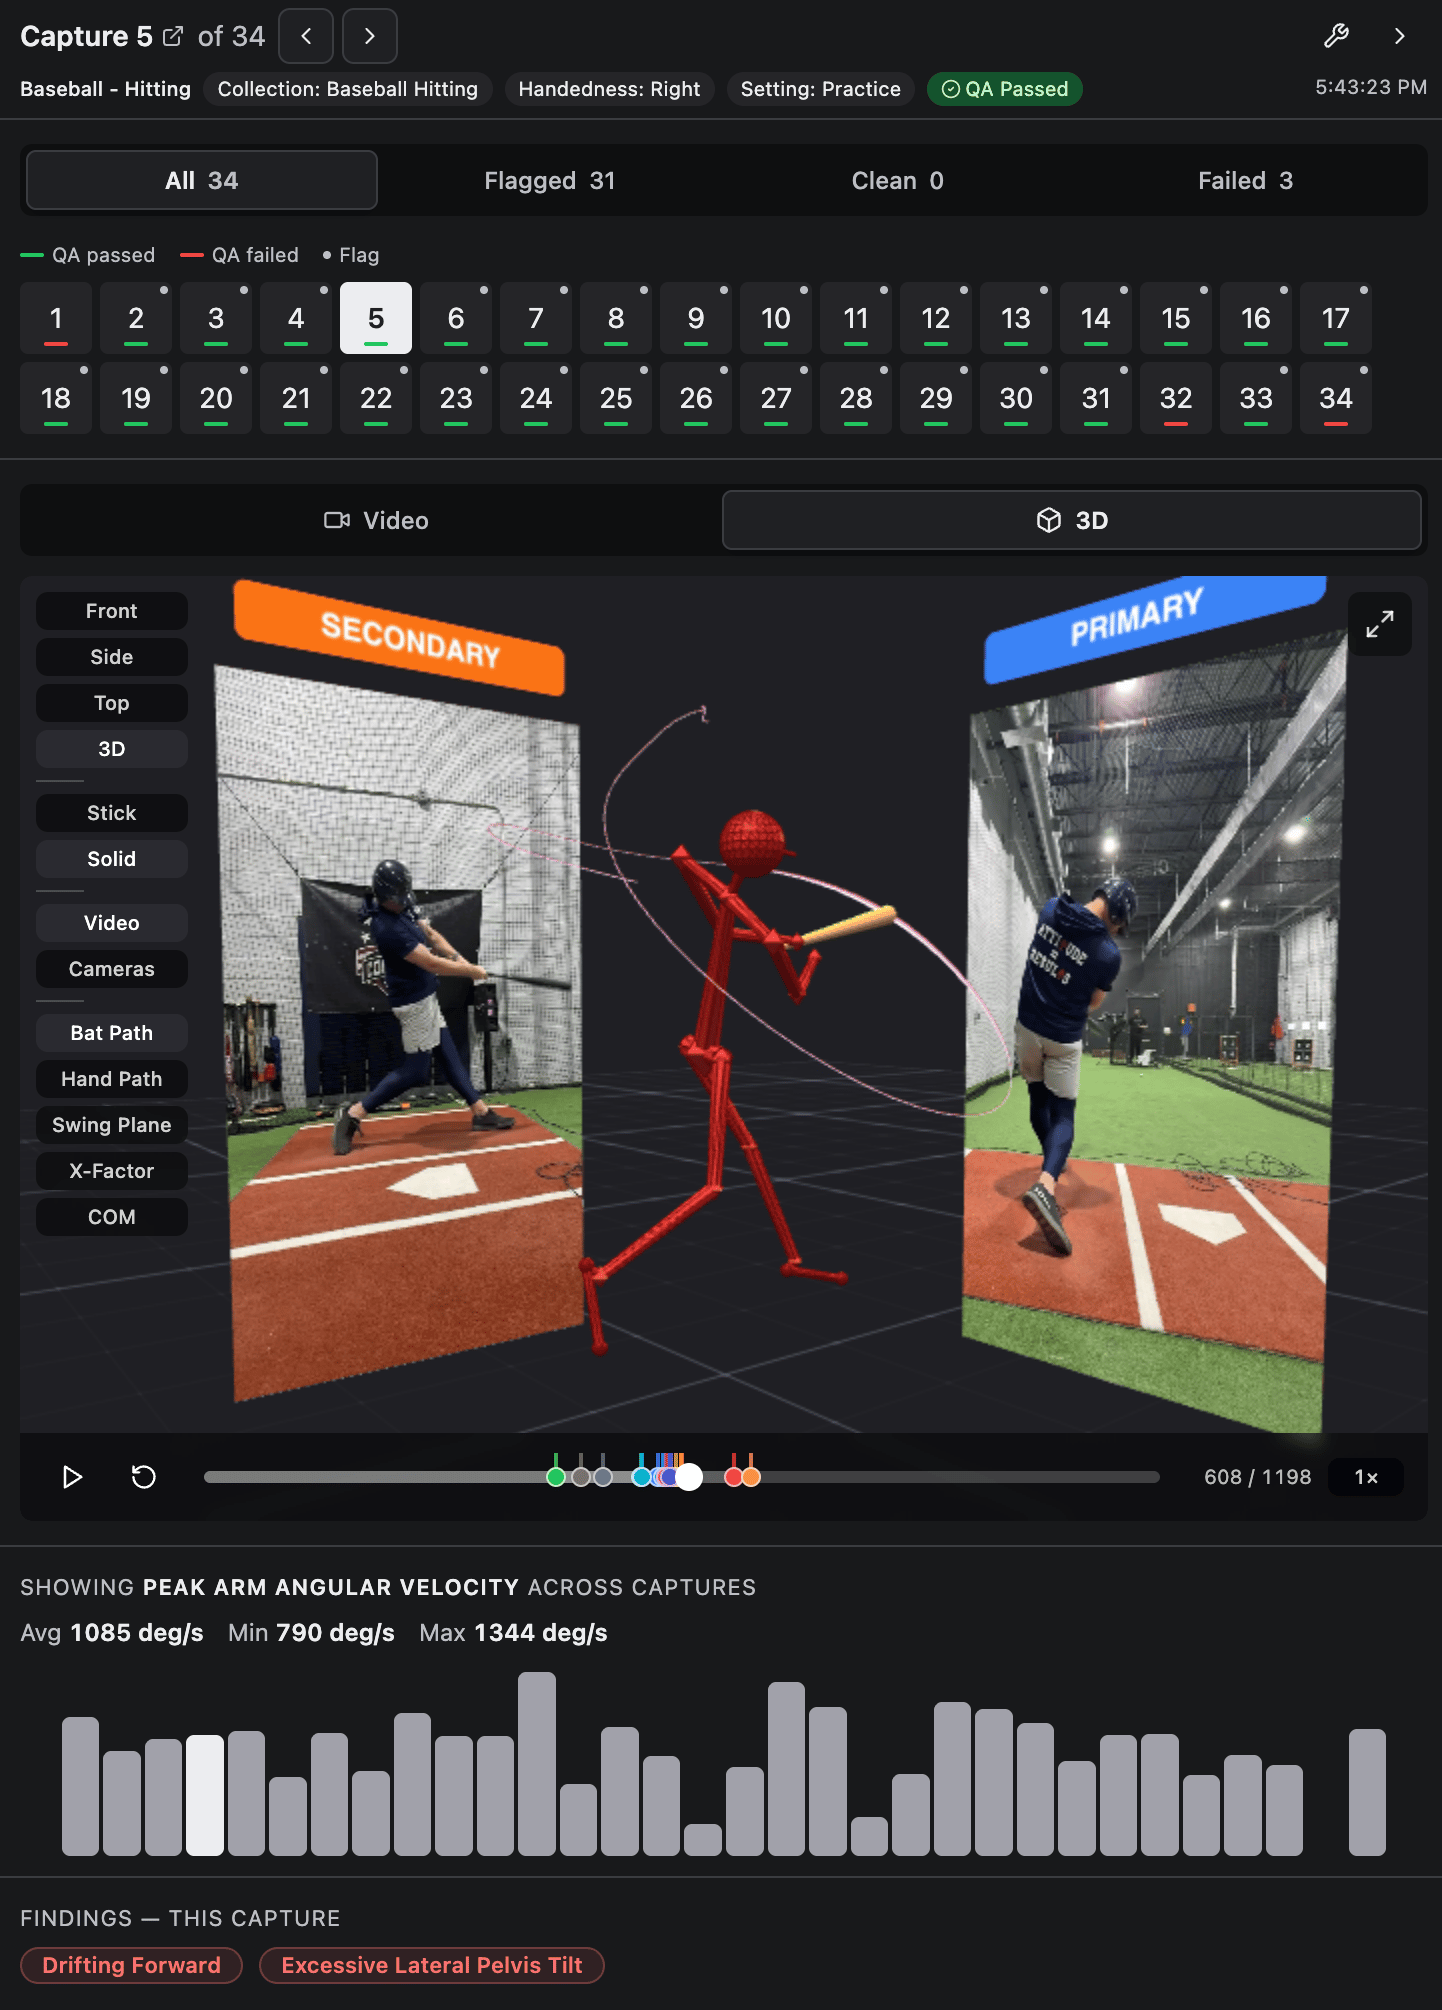
        The panel on the right in the assessment view allows you to view any capture in full 3D along with each video. This viewer is a quicker way to explore the movement in 3D - along with movement flag indicators - without needing to load the full web visualizer.

        * Quickly move between different captures

        * See which captures triggered which movement flags (e.g. drifting forward, stiff knee landing)

        * Play or scrub through the movement, viewing both video and 3D avatar

        * Manipulate the 3D space or add annotations to really see athlete position at every moment

        * Jump to annotated movement events on the timeline
      </Column>

      <Column>
        <img src="https://mintcdn.com/upliftlabs/zrkhfCm1PbAiD5WS/images/guides/reviewing-assessment-results/assessment-capture-viewer.png?fit=max&auto=format&n=zrkhfCm1PbAiD5WS&q=85&s=3ad842f265d7289d733c5c35079b04f4" alt="" style={{display: 'block', margin: '0 auto', height: '400px'}} width="1442" height="2010" data-path="images/guides/reviewing-assessment-results/assessment-capture-viewer.png" />
      </Column>
    </Columns>
  </Accordion>

  <Accordion title="Raw data access" icon="database">
    Any captured movement will generate a wealth of metrics and events, including our full generic outputs and movement-specific events and metrics (e.g. takeoff, landing, hip-knee dominance for jump movements; kinematic sequence, x-factor, drifting forward for hitting; etc.)

    <Columns cols={2}>
      <Column>
        <Card title="Summary" icon="list">
          Discrete metrics (like peak velocities, jump height, max x-factor) as well as all movement flags. Summary-level raw data is available in Pro and higher plans.
        </Card>
      </Column>

      <Column>
        <Card title="Full" icon="database">
          All the data in the summary list, as well as all time-series kinematics (joint angles, velocities, etc.), all 3D data, and all detected events. Full data access is available for an additional fee. Reach out to [sales@uplift.ai](mailto:sales@uplift.ai) for more info.
        </Card>
      </Column>
    </Columns>

    For a full list of metrics and events we generate for each movement, review the Movement Library in our biomechanics docs.

    Raw data can be accessed in one of two ways - by exporting a CSV or querying our API.
  </Accordion>

  <Accordion title="Data exports via CSVs" icon="file-spreadsheet">
    CSVs can be exported through the web portal at [platform.uplift.ai](https://platform.uplift.ai). You can export from the following places:

    * **Captures section**: Select the captures you would like to download and click "Export Kinematics" in the upper right.

    * **Assessments view**: Click Export in the upper right and select "Export Kinematics".

    The resulting CSV will include all data from all selected captures.

    <img src="https://mintcdn.com/upliftlabs/zrkhfCm1PbAiD5WS/images/guides/reviewing-assessment-results/assessment-export.png?fit=max&auto=format&n=zrkhfCm1PbAiD5WS&q=85&s=5d5347432cb4e0d80e03269c63fbbf52" alt="" style={{display: 'block', margin: '0 auto'}} width="1968" height="582" data-path="images/guides/reviewing-assessment-results/assessment-export.png" />
  </Accordion>

  <Accordion title="Data API" icon="code">
    All raw data can also be queried through our API. For more information on enabling API access, contact us at [support@uplift.ai](mailto:support@uplift.ai).

    For documentation on our API, please read through our [API documentation](https://docs.uplift.ai/api-reference/introduction).
  </Accordion>
</AccordionGroup>

## Best Practices

<AccordionGroup>
  <Accordion title="Tips for a great capture" icon="star">
    * Avoid dark clothing, especially all-black outfits. They make it harder for Uplift to distinguish joint positions.

    * Set up in an area with even, consistent lighting. Strong backlighting can compromise capture quality.

    * Before you start recording, do a practice movement to confirm the athlete stays fully in frame for the entire movement, including any implements like a bat or club.

    * Make sure to capture the full movement. The beginning or end of the movement getting cut off will often result in the capture failing QA. (Auto-capture can help - it auto-trims the video for you).

    * When capturing through netting, make sure the athlete is clearly visible.

    * Keep both devices charged above 50% at all times. iOS can deprioritize video frame rates to save power when the battery gets low.
  </Accordion>
</AccordionGroup>